What does it mean ? To turn the aero plane solely by reference to the flight instruments.
Turning using flight instruments is a critical skill for pilots flying under Instrument Flight Rules (IFR), as they must rely entirely on cockpit instruments to maintain orientation, heading, and attitude during a turn.
Unlike visual flight, where pilots can look outside for cues, instrument turns require precision and constant reference to specific instruments to maintain control and prevent disorientation.

Key Instruments for Instrument Turns
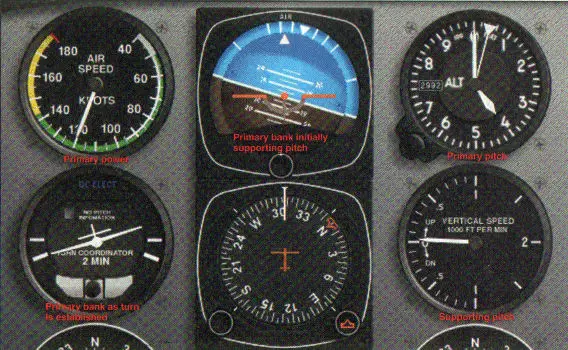
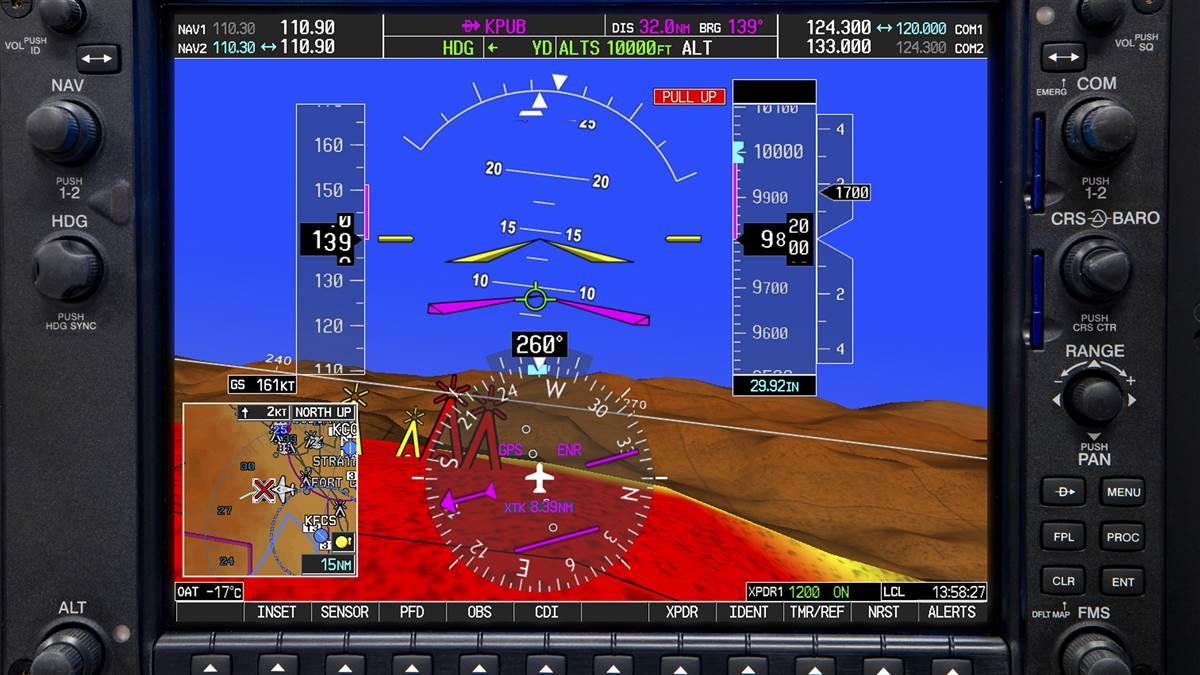
- Attitude Indicator: The primary reference for bank angle and pitch during a turn.
- Heading Indicator: Used to establish and maintain the desired heading during the turn.
- Turn Coordinator or Turn and Slip Indicator: Provides information about the rate of turn and whether the turn is coordinated.
- Altimeter: Monitors altitude to ensure you maintain level flight while turning.
- Vertical Speed Indicator (VSI): Helps to detect any unintended climbs or descents during the turn.
- Airspeed Indicator: Monitors airspeed to ensure it remains within safe limits during the turn.

Procedure for Turning Using Flight Instruments
1. Establish the Bank Angle
- Set the desired rate of turn: In instrument flight, turns are typically made at a standard rate, which is 3 degrees per second (or a 360-degree turn in 2 minutes). Use the attitude indicator to establish the bank angle necessary for a standard rate turn. For most aircraft, a bank of approximately 15-20 degrees is sufficient.
- You can estimate the correct bank angle using the formula: Bank angle ≈ 15% of your true airspeed. For example, if flying at 100 knots, the approximate bank angle should be 15 degrees.
- Use the turn coordinator: The turn coordinator (or turn and slip indicator) helps you achieve a standard rate turn. When the needle or ball is centered on the “standard rate” mark, you are turning at 3 degrees per second.
2. Maintain Constant Altitude and Airspeed
- Cross-check the attitude indicator: Ensure that the pitch attitude remains level during the turn. A common mistake is for the nose to drop or rise unintentionally during the turn, leading to altitude loss or gain. Make small pitch adjustments to keep the aircraft level.
- Monitor the altimeter: Keep a close eye on the altimeter to ensure that you are not gaining or losing altitude during the turn. If the altimeter shows any deviation, adjust the pitch slightly using the attitude indicator.
- Check the airspeed: As you bank the aircraft, the airspeed should remain steady. If you notice an increase or decrease in airspeed, adjust the power setting or pitch attitude to maintain the desired speed.
3. Control the Turn Rate and Heading
- Use the heading indicator: Monitor the heading indicator to track the change in your heading. A standard rate turn changes the heading by 3 degrees per second, so a 90-degree turn will take about 30 seconds. Begin rolling out of the turn slightly before reaching the desired heading to account for the time it takes to stop the bank and level the wings.
- Coordinate the turn: Ensure the turn is coordinated by referencing the turn coordinator’s ball or needle. A centered ball indicates that the turn is coordinated (no slipping or skidding). If the ball is out of center, apply rudder to bring it back into alignment with the turn.
4. Roll Out of the Turn
- Begin roll-out slightly before reaching the desired heading: Depending on your rate of turn and aircraft inertia, start rolling out about 5-10 degrees before reaching the target heading. This allows time for the wings to level without overshooting the desired heading.
- Level the wings: Use the attitude indicator to bring the wings level smoothly, without abrupt control inputs.
- Cross-check instruments: Once the turn is completed, confirm that you are on the correct heading, maintaining level flight, and at the appropriate airspeed.
If you are interested you should read about How to Fly Straight and Level on Instruments

Common Errors and How to Avoid Them
Overbanking: Pilots may bank the aircraft too steeply, causing a turn that is too rapid and difficult to control.
- Prevention: Use the attitude indicator to set a precise bank angle and cross-check the turn coordinator to maintain a standard rate turn.
Losing altitude during the turn: It’s common for the nose to drop slightly during a turn, leading to a loss of altitude.
- Prevention: Constantly check the attitude indicator and altimeter, and make small pitch adjustments to maintain altitude.
Uncoordinated turns: If the turn is not properly coordinated, the aircraft may slip or skid, leading to inefficient and potentially dangerous flight dynamics.
- Prevention: Cross-check the turn coordinator and use rudder to keep the turn coordinated. If the ball is to the left, apply right rudder, and vice versa.
Inconsistent heading: If the heading indicator is not properly cross-checked, the aircraft may drift off its intended course, leading to navigational errors.
- Prevention: Consistently monitor the heading indicator and use small, precise inputs to stay on course. Anticipate the roll-out and adjust accordingly.
Instrument Scanning Techniques for Turns
An effective scan is vital when performing turns using flight instruments. There are several scanning techniques that pilots use to ensure all critical instruments are monitored:
- Radial scan: Start with the attitude indicator and then move out to check the altimeter, heading indicator, airspeed indicator, and turn coordinator, before returning to the attitude indicator.
- Selective radial scan: Similar to the radial scan but with extra focus on the instruments that are most critical for the maneuver (e.g., the attitude indicator and heading indicator for turns).
- Inverted-V scan: Focus primarily on the attitude indicator, scanning up and to the left to the airspeed indicator, then up and to the right to the altimeter, forming an inverted “V” pattern.
The key is to constantly scan your instruments, not fixating on any single one for too long. This helps prevent “tunnel vision” on one instrument while others drift out of their desired settings.

Rate of Turn Considerations
- Standard Rate Turns: These are used in most IFR operations and involve a turn rate of 3 degrees per second. This is the default unless ATC or the flight situation requires a more rapid turn.
- Half-Standard Rate Turns: These are slower turns (1.5 degrees per second) and may be used in larger or faster aircraft where a full standard rate turn might be too steep.
- Timed Turns: In some cases, particularly when the heading indicator is unreliable, a pilot may time the turn based on the expected duration (e.g., a 180-degree turn should take approximately one minute at a standard rate).
FAQs
1. What does turning using flight instruments mean?
Turning using flight instruments involves maneuvering an aircraft by referencing cockpit instruments rather than visual cues, often used in Instrument Flight Rules (IFR) or poor visibility conditions.
2. Why is it important to use flight instruments for turning?
Flight instruments provide accurate, real-time data on the aircraft’s attitude, heading, and bank angle, ensuring safe and controlled turns, especially in low visibility or challenging weather.
3. What are the key flight instruments used for turning?
- Attitude Indicator: Displays the aircraft’s pitch and roll angle.
- Heading Indicator: Shows the aircraft’s directional orientation.
- Turn Coordinator: Indicates the rate and direction of the turn.
- Compass: Provides directional information.
4. What is the role of the attitude indicator during a turn?
The attitude indicator helps pilots maintain the desired bank angle, ensuring the aircraft stays stable and the turn is correctly executed.
5. How does the turn coordinator work?
The turn coordinator shows the rate of turn and helps the pilot determine whether the aircraft is in a coordinated, slipping, or skidding turn. The ball in the inclinometer portion helps maintain balance.
6. What is a coordinated turn?
A coordinated turn is when the forces acting on the aircraft are balanced, with no slipping or skidding. Pilots achieve this by using proper amounts of aileron and rudder.
7. What is the “Standard Rate Turn”?
A standard rate turn is a turn in which the aircraft changes direction by 3° per second, completing a 360° turn in two minutes. It’s commonly used in IFR to maintain predictable turns.
8. How do you identify a standard rate turn on instruments?
The turn coordinator has a marked scale showing standard rate. When the needle aligns with these markings, the aircraft is in a standard rate turn.
9. How do pilots calculate the bank angle for a standard rate turn?
The bank angle can be estimated using the formula:
Bank Angle = (Airspeed ÷ 10) + 5
For example, at 120 knots, the bank angle would be approximately 17°.
10. What are common challenges when turning using flight instruments?
- Misinterpreting instrument readings.
- Over-banking, leading to steep turns.
- Ignoring the inclinometer, causing uncoordinated turns.
- Spatial disorientation during prolonged IMC flights.
11. How can spatial disorientation affect turning?
Without visual references, pilots may experience illusions, such as the “leans,” causing them to feel the aircraft is level when it’s actually turning, or vice versa. Proper use of instruments mitigates this.
12. What is the role of the heading indicator in turns?
The heading indicator helps pilots monitor and adjust their directional changes, ensuring accurate navigation during turns.
13. How does airspeed affect turning?
Higher airspeeds require wider turns and greater bank angles for a standard rate turn, while slower speeds allow tighter turns with smaller angles.
14. What is a slipping or skidding turn?
- Slipping Turn: Insufficient rudder, causing the tail to swing inward.
- Skidding Turn: Excessive rudder, causing the tail to swing outward.
15. How do you correct a slipping or skidding turn?
Pilots use the rudder pedals to center the inclinometer ball, ensuring balanced forces for a coordinated turn.
16. What is the “rule of thumb” for rolling into and out of turns?
Roll into the turn smoothly, using coordinated aileron and rudder inputs. As the desired bank angle is reached, neutralize the controls. To exit, apply opposite inputs to return to level flight gradually.
17. How do you maintain altitude during a turn?
Pilots monitor the attitude indicator and vertical speed indicator, applying back pressure on the yoke or stick as needed to counteract the loss of lift from the bank.
18. Why do steep turns require more back pressure?
As the bank angle increases, the vertical component of lift decreases, requiring additional back pressure to maintain altitude.
19. How do you execute a turn using instruments only?
- Set the desired bank angle using the attitude indicator.
- Monitor the heading indicator for direction changes.
- Keep the turn coordinator ball centered for coordination.
- Adjust power and pitch to maintain altitude and airspeed.
20. What are common mistakes when turning using instruments?
- Over-reliance on a single instrument.
- Failure to monitor altitude and airspeed during the turn.
- Rapid or jerky control inputs.
21. How does turbulence affect turning using instruments?
Turbulence can disrupt instrument readings and cause unintentional altitude or attitude deviations. Pilots must use smooth inputs and cross-check instruments frequently.
22. How do autopilots assist in turning using instruments?
Autopilots can execute precise turns by maintaining bank angles, heading changes, and altitude, reducing pilot workload during IFR conditions.
23. How do IFR pilots practice instrument turns?
Pilots use simulators or practice under a safety pilot or instructor, wearing a view-limiting device to simulate IMC while honing their instrument cross-check and control skills.
24. What role does the flight director play in turning?
The flight director provides visual guidance on the attitude indicator, helping pilots execute smooth and accurate turns based on programmed navigation inputs.
25. What is the significance of rate-of-turn indicators?
Rate-of-turn indicators ensure the aircraft turns at the desired rate, critical for timed maneuvers like holding patterns or standard instrument approaches.


Leave a Reply